Friday, July 22, 2011

Jar bliss

Yay for jars, glass bottles, and candles. I love this craft and think if I could everything in my house would look like this. This little bit of craftiness is great for a hour or afternoon of doing-it-yourself. It could be easily done for a party, wedding, or as a gift. Feel free to change it up as you like it and bedazzle it as you wish. It is all yours to love on and enjoy. I will be using a few glass jars and a candle today and have collected some lace, ribbons, buttons, and pendents.


Each one I have decided to do a bit different. Some will have ribbon and the others lace. Measure how much ribbon you would need to go around the jar you will be using, make a nice clean cut, a nice sharp scissors works wonders with ribbon and lace. You can use some hot glue or double-sided tape, which I used works just as well. Making sure it is on there nicely you can decide what you would like to add or just keep it  plain, it's all up to the look you going for. To one of them I placed some buttons on, I used some sticky dots which I found at a craft store or some hot glue will do the trick. Another jar I placed some lace on and wrapped some twine around as well to another lace and a pendent. 


Even just ribbon can change it up and add some color. These jars add so much to any desk or room, most things can be placed in them and its a great way to easily find things or just use them as a decor piece. It's great to play around and see what you can make or come up with and the great thing is they can easily be changed as you wish. You can change the ribbon when the seasons change, place some lace around some tall candles and use them as a centerpieces or for a dinner party, the uses are endless.


Happy Crafting.

Thursday, March 24, 2011

Framing More

There is so much you can do with pictures. We all love to frame our most memorable pics and place them around the house, but there is only so many pictures you can add to one frame. This craft is great because it can be changed and added to at any time. You can use it for pictures, cards, favorite recipes, love notes, favorite quotes, or reminders. Using the idea of a memo board but changing it up a bit.

You will need a decent sized frame. The one I will be using is 16x20 inches. (the size is up to you)
A canvas board (optional)
A piece of fabric, any kind.
String or Ribbon.
Mini cloth pegs.
And a staple gun or hot glue gun.


The frame I am using I found at a craft store on sale because it had no back, you can find well priced ones at second hand stores or most craft stores. Just keep a look out for sales or deals. If you are using a canvas, make sure it is the right size for the frame so that it fits well. Now that we have all that lets get started.

Taking our piece of fabric, we are going to measure it to the size of the frame and cut it accordingly. If you are using a canvas, staple your fabric around your canvas nice and tight. If you are not using a canvas hold onto that piece of fabric and we'll get back to it in just a minute.

Measure your string or ribbon according to the width of your frame and depending on what you are wanting in your frame, how many pieces you will need. I am using string for mine, I have cut it and knotted it on both ends and have stabled it into the back of my canvas where I wanted it. You can then either nail your canvas to your frame or hot glue it to it, whatever works best for you. If you are not using a canvas, you can hot glue your string straight onto your frame and once you have glued all your pieces you can then hot glue your fabric onto your frame as well, sealing it nice and tight.


We are almost done, all we need to do now is add to it our little items that we have chosen to display and enjoy. Using the mini pegs you can peg on your photos that you would like, your favorite recipes that can hang in your kitchen, or your little reminders in your bedroom.


The limit is yours to what you want to display. It can be a great addition to a child's room with their favorite photos, or a grocery list and reminders for that week. It is all up to you. Fill it up, add to it, and change it up. Enjoy crafting.

Tuesday, March 8, 2011

Making Memories

Photo albums are fun and a great to show off our special occasions, embarrassing childhood moments, and all the family. I recently got married and have now received all my beautiful pictures of the wedding. But instead of buying an album that I couldn't really make personal, I decided to make my wedding album, it was quite the task but I have to say it is very rewarding once completed. Now with the freedom to design what you like you can create it just the way you want it. Birthday, Wedding, Anniversary, Baby Shower or a Special Occasion, there is no limit to what memories you want to display. What I love about this craft is everything I used I either got on sale or used a coupon, it makes it even more rewarding when you know you got a good deal on something. A great tip is to always keep a look out for good deals and sales that are happening, it might take a few weeks to accumulate all that you need for your craft, but it is worth it at the end of the day.

You will need to start off with a blank album, card-stock that you like, and whatever else you would like to place on the front of the album or on the inside.


For my album I used  8x8 green photo album, yellow card-stock, and white letters. I also found this gorgeous button which I wanted to place on the front. So I used some brown organza, sewed the button to that then hot glued the organza to my album. I also hot glued my card-stock to my album and placed photo corners to add to the look on the front.


With the front complete lets move on to the inside. I choose the color of card I would like to have as my pages and cut them to the right size.


Using photo corners to hold my pictures in place I placed my pictures in the order and style as I want and stuck them onto the card-stock. Photo corners come in different colors or if you not a fan of them there are little stickies that you can buy and place on the back of your photo that will hold them there just as good. 


Slide in your pages and enjoy your hand-made personal Photo Album. 


There is no limit to what you can create and place in your album. Words, tokens, letters, or photos. Have fun and enjoy.

Tuesday, February 22, 2011

Favorite Banana Loaf

We all have that one recipe that you know you cannot mess up, it always comes out perfect, and we never want to try another recipe. Well this banana loaf recipe is that type of recipe. I absolutely adore this recipe and it is so easy and quick to make. It's great for afternoon tea, when you have guests over, or a new neighbor. So enjoy the smell of warm banana loaf coming from your kitchen.

Delectable Ingredients

1/2      c soft butter
2/3      c sugar
2         eggs
1 3/4   c cake flour
2         t baking powder
1/4      t bicarbonate of soda
1/2      t salt
1         c banana pulp (approx 4 ripe bananas)
1         t vanilla essence


~ Cream the butter and sugar together and beat in the eggs one at a time.

~ Sift the dry ingredients together and stir alternately with the banana pulp in the creamed mixture. Stir in the vanilla.


~ Bake in a greased pan in a moderate oven (375 F) for 1 hour.


Enjoy a delicious piece of banana loaf. Serve warm, either by itself or with some butter.
Happy baking.

Monday, February 14, 2011

Happy Valentine's Day

Happy Happy to all you love birds. Hope it is a gorgeous day for all. Great time to love on family, friends, and loved ones.


Sending Love

Thursday, February 10, 2011

Sharing the Love

Valentine's Day is almost upon us and I just had to share some of these great finds. There are just such cute ideas to craft and make, how do you pick. Thanks to good ol Martha Stewart she has given me some great ideas to make my own. Some lovely Chocolate Cookies made into hearts, you can also use normal sugar cookie mix and decorate how you please, fun for the kids or a treat for a loved one.


I fell in love with these Red Velvet Whoopie Pies, this is something I am definitely going to whip up for Valentine's Day.

How could you not want to try one of those. Yummy.


I just thought this was some gorgeous wrapping for any gift on Valentine's Day. DIY Project: 3D Valentines. Absolutely beautiful and unique and looks like so much fun to create. Great inspiration for birthday gifts as well.


Enjoy sharing the Love on Valentine's Day. 

Crafting some Love

Valentine's Day. This one day creates a month of love, how exciting. What a great time to make something personal for our loved ones. It can be home made, baked or bought, but adding a little personal touch can add that extra special feeling to the gift. And who doesn't love giving that special gift or receiving one in that case.

For Valentine's this year I decided to make something for my loved ones. An envelope of Love. 

I am using a mini petal envelope template, you can use any color card or paper when creating this envelope. You need to decide what you would like to put in there for them, to determine the size of your envelope. I will be giving Herbal tea, so my envelope is  4" x 4" which then makes my petals 2" each. Make sure your sides are half the size of your envelope, it allows them to reach the center perfectly and close easily. 


I decided to use a cream card and double it as a card, so my love note will be on the inside of my envelope. 


Placing what you want inside, fold it up and there you go, your home made gift and love note for your loved one.  You can seal it with a sticker or cute ribbon. 


Enjoy crafting. 

Thursday, February 3, 2011

Every Little Detail - DIY Bliss

Planning a wedding is never an easy task. Most brides have some idea of how they want it to look on that  day. My favorite part about weddings is seeing how the bride and her team create her wonderful day, through design and planning using the venue, lighting, decor, food and flowers.
I wanted to share with you My Wedding Day. The planning of which took about 3 months, but on that day every minute spent was worth it. I had incredible help from family, friends, and of course my handsome husband.
It was a budget friendly and eco-friendly wedding, a lot was hand-made and borrowed. I wanted Our Day to represent us as a couple, our different personalities and likes.

Enjoy...


Joshua and I on our wedding day. My wedding dress and getting ready.


My gorgeous shoes where made perfect by the lovely Kate Pewthers. Check her out on Etsy. She added mustard colored fabric rosettes to them and a gorgeous flower to my black birdcage headpiece. She also made my bridesmaids hair pieces too. A perfect touch.


I spent a lot of time going through magazines and on the internet looking for ideas. The ones I liked I adapted to our day, I added our colors and some personal touch to the design. I wanted something fun to show where each guest was seated that day. I made these paper rosette name cards for each guest and used some old vintage windows to display them.


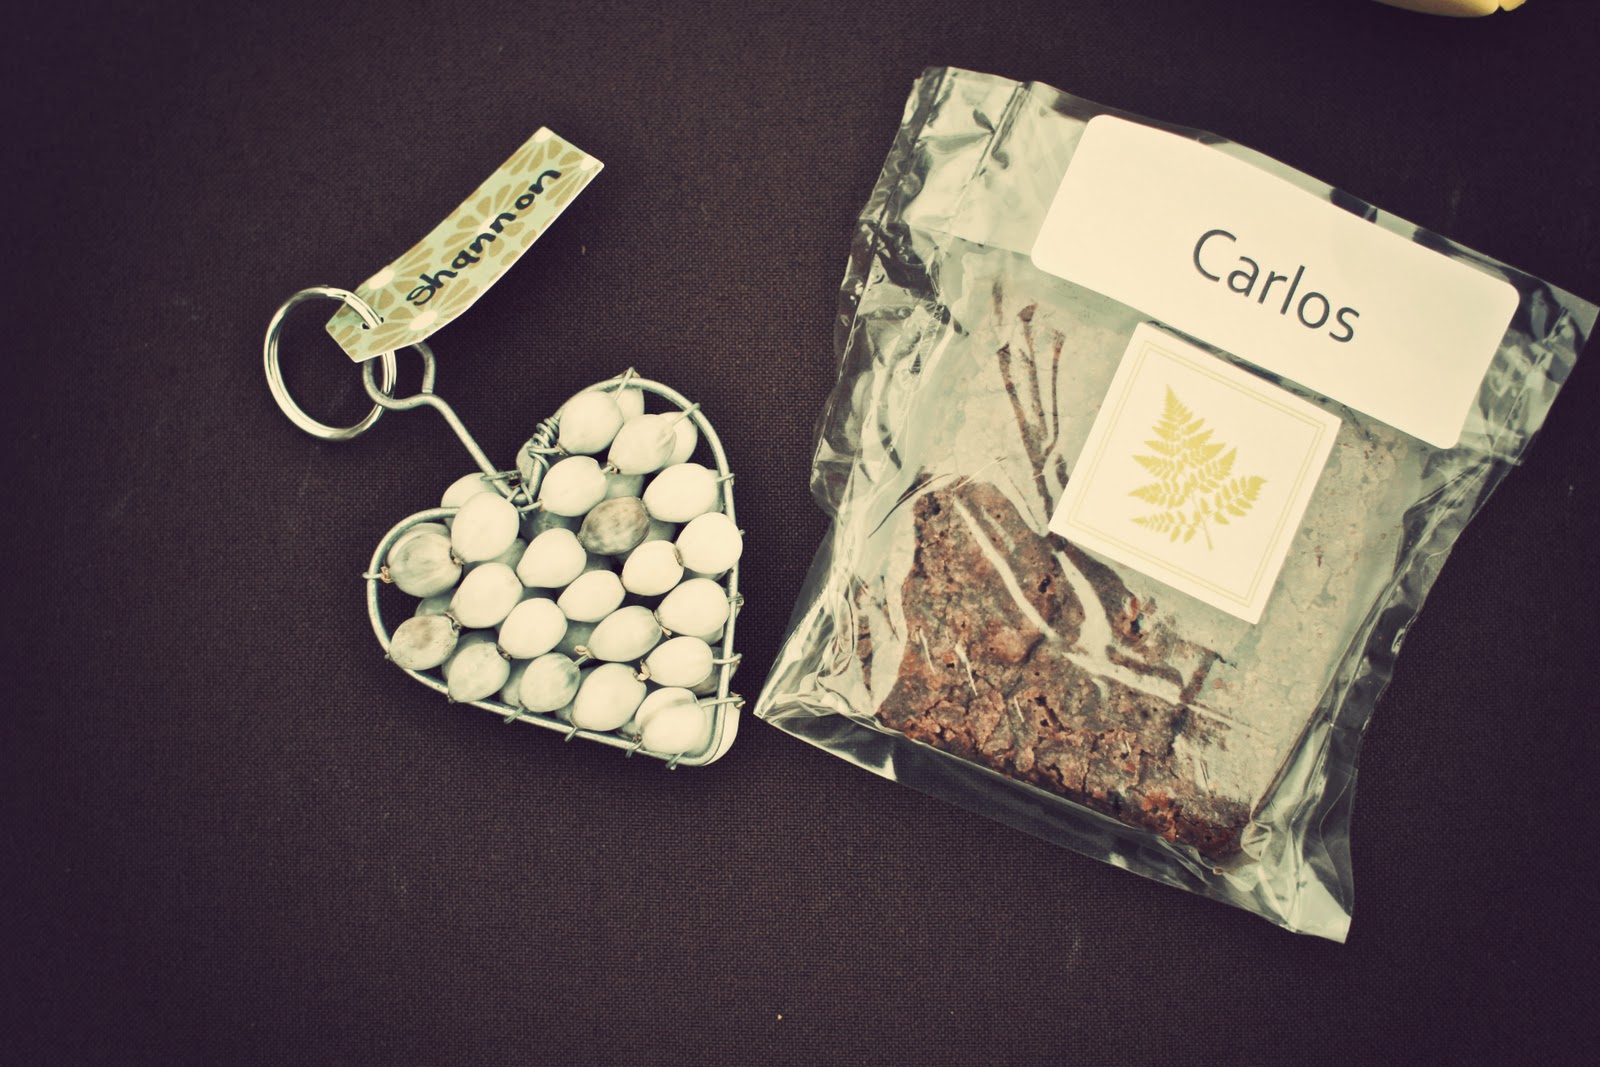
Our favors for our guests were wire and seed key chains hand-made in South Africa for the ladies and home-made brownies for the men. Favors can take out a lot from your budget, so try looking for fun ideas that can work for you. Some ideas in posts to come.


Our table names where our favorite songs. We made each name with normal scrap-booking card and dell sticks, which were just placed in our arrangements on the tables. Personal and easy. Our dinner menus were printed and folded into a cootie catcher. 


Our tables where an arrangement of around the house vases and mason jars. I went to the local flower market and chose flowers that worked with our theme and budget and just went from there. We used succulents, billy buttons, bells of ireland, and teddy bear sunflowers. Don't be shy to try something different, when it is all put together it works beautifully.


My gorgeous bouquet was made by an incredibly talented friend. Sometimes it is not easy trying to explain what you have in your head and in this case there where a lot of those moments. The best way to deal with this problem is find pics of flowers and bouquets that you like cut them out and build your own bouquet and arrangements. It will help everyone understand your thoughts and ideas. I wanted something different and unique that added to my dress and our beautiful day. Using most of the same flowers in our arrangements on the tables we added in some roses and feathers to finish off the look. Perfect.


Every little detail can add to your day. But not everything has to break the budget. There were a few things that we wanted at our wedding that we made or we just came up with another plan. One being we wanted a photobooth so we just used one of our cameras and a few props put up a background and just allowed people to have fun with it. We got some great memories just from that and we didn't have to buy anything. Don't be afraid to try different things to find the one that you love. It is your day and there is nothing like looking around and knowing that you had a big part in everything that is there.

I'll end off with a huge thanks to family and friends, without them our day would have not been possible. We had so much fun and an absolutely unforgettable day! Thank you to everyone that lent a hand. You helped make it happen.

A very big thank you to the lovely Jesse Thomas. All the photos you see were done by her. Her work is amazing, she is an absolute joy to work with and made it so much fun for us! Thank you Jesse for capturing every moment. jessesthomas.blogspot.com

Here are a few more pics.. why not..